Showing posts with label party. Show all posts

Wednesday, 8 July 2015

How to make Bunting.


About four years ago we noticed more and more people getting into bunting. This traditional decoration can add a beautiful yet comforting homely touch to any occasion. However more and more people have been using bunting to decorate their homes all year round.

Bunting is very simple and cost effective to make. However some people have asked us to run a course in making bunting in our Colchester shop. Not everyone is lucky enough to be able to visit us in our little outpost of sewing and crafting in Essex. To help everyone out we decided to make a quick Bunting Tutorial here.

How much Fabric do I need?
No where near as much as you think. Of course the size of your triangles and the space between your triangles will effect the amount of fabric, as will the width of the fabric, In this example our triangles sides were 20cm long and the space between each triangle was about a hands width. 20cm of polycotton that was 112cm wide gave us over 2.5 metres of bunting! so 1 metre of fabric should give you around 12 metres of bunting!

What fabric is suitable for bunting?
Just about any fabric is suitable, however it's best to avoid fabrics that fray and crease.

Hessian fabric can give a lovely rustic and natural feel.

Quilting Cotton and Dressmaking Cotton are both suitable for bunting and come in vibrant colours.

Polycotton is light and cheap and fray resistant.


How do I finish the edges of the triangles (or pendants) off?

There are three main ways of making sure your pendants do not fray.

1) Cut them out with Pinking Sheers. This gives a pleasing zig zag finish and is VERY quick and easy.

2) Bias bind the edges. This can look stunning if you use a contrasting bias but needs a steady hand and LOTS of patience.

3) Line the Pendants. Simply cut out twice the number of triangles and sew them right sides together before turning them out. This literally doubles the cost of the bunting and more than doubles the time needed. However the bunting will look stunning from both sides.

How to I cut out the triangles?

To begin with you will need to make a pattern or template. Using a protractor and a ruler draw a lin 20 cm long. At each end use the protractor to make an angle of 60 degrees. Then use the ruler to draw in the final two lines which should meet in the middle.

We use an equilateral triangle (one where all the angles are 60 degrees and all the sides the same length) to give us more options about which way up the triangle will go.

If you're using the pinking shears to stop the fabric from fraying trim along the one side of the fabric.
Now lay your template on the corner of the fabric with one of the sides of the triangle on the side of the fabric. Using a ruler to give a sharp edge draw around the triangle in chalk.


Flip the pattern over and draw another triangle upside down and next to your first. Repeat this process. This is called tessellating by the way.


Now simply cut out along the chalk line. A 20cm strip of fabric that is 112cm wide should give you around 8 triangles.


What do I sew the triangles onto?

You can sew the triangles onto ribbon or cotton tape. However We have used Bias Binding. This has the advantage of wrapping around the top edge of the triangles to make them look neater.

Simply place the triangle along the middle of the bias and fold it over, pinning it in place before running it through the sewing machine.

I left a gap about as wide as my hand between the triangles, but you can choose to have a smaller gap or no gap at all. This piece of bunting was for a very set colour scheme. However you could always buy a metre or two of different fabrics and mix the triangles up.

And there you have it, easy to make bunting to adorn garden parties, wedding and very tall workmates.

Wednesday, 26 November 2014

How to make a shrug or bolero top


In December Colchester is playing host to a Narnia themed party night that promises to be most enchanting. As with many themes nights there is a lose dress code of "Narnia character  or white". I decided to help out with this tutorial for a regal white queen shrug project which could be adapted for many other uses. This shrug was first taught to me by my fashion tutor Julie Stammers when I studied at adult community collage. She has very graciously allowed me to replicate it here for you all (she's lovely, trust me)

The initial shrug requires between half a metre and a metre of fabric depending on how long you want it and how big a collar you would like.

All you need are some 
Fabric   
Fleece would work very well with this shrug.

Step one
 Draw out the pattern.

I know this is an odd little pattern, the shrug is actually one single pattern piece.


As the diagram says the long rectangle in the middle is the measurement of wrist to wrist across the back with the arms fully extended plus 30 cm for ease. The bulbous bit in the middle is from armpit to armpit plus 20 cm for ease.  How high is the bulbous (or from this point on the back and collar) of the pattern? That's entirely up to you. In college we used a  far shorter back and collar, but I want this to have a regal quality so I went VERY large. Once you see how the shrug is sewn together you will understand how to alter the back and collar for different styles. 

Step two 

Cut out your fabric using the pattern and sew up the sleeves.

Right sides together fold the pattern piece in half along the length, Pin the sleeves section together and sew, stopping about 5 cm before the back/collar section. Pull the shrug right side out and check it out :)

Our beautiful model Jane showing off the new shrug.


Now hopefully you can see how the height of the collar and back effect the garment. This shrug covers the entire back and then has a large collar. If you have used a fabric that is fray proof and looks nice on both sides the behold you have a shrug! If your fabric looks nice on both sides but frays you could just hem the back and collar or bias bind them along with the cuffs. A warm snugly shrug made of fleece would be lovely by this point.

However the joy of this garment is you can adapt it and bend it to your evil will. I want a  shrug that's lined in white satin lining and even a little pipping. 
Lining and outer pinned together on the back and collar.


Step Three
 Cut out the lining and sew the arms up of the lining just as we did with the outer layer.
RIGHT SIDES TOGETHER pin the lining and outer together around the back and collar.


If your using piping with a flange just sandwich it between the outer and lining and sew together using a zipper foot.


Some people stress about where the lining joins the outer around the sleeves. Just take your time, pin everything in place and you'll see where you need to sew.


Pull the garment right side out through the sleeves. 

Pull the shrug into shape and hem the sleeves inner and outer together and you have a simply stunning regale shrug
Suitable for  any white or snow queen.


Thoughts.

The back and collar are easily adjusted. They don't have to be the same size so you could have a larger section UNDER the arms to form a long back and then less above the arms to form a smaller collar.

We HIGHLY recommend making a mock up first in a cheaper fabric such as lining or muslin first. Different people tend to need different amounts of  ease etc. 

This shrug is so quick and easy to make you could use different fabrics for different parties as well as day to day wear.


Monday, 3 June 2013

How do you get a design onto your t-shirt or other fabric?

Have you ever suddenly realised you had mixed up your party invites and you had a costume party to go to in one hour? This happened to me and my girlfriend a few weeks ago. We ran into my sewing room all set to fulfil the brief of the party, we had to bring out our inner geek. I took the quick and simple option and just put on one of my many Star Wars T-shirts. My girlfriend wanted to put a design onto an old t-shirt, in less than an hour! We didn't have time for Dylon Image Maker, we only had time for pens, and weirdly enough, Wundaweb.
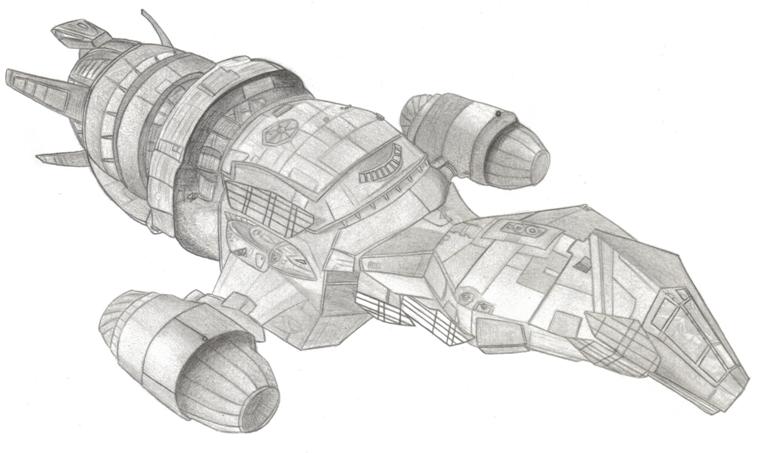
We had some fabric pens and permanent markers, however we only had one shot to make this work. The initial design was a little complex with plenty of chances to make mistakes. If you're wondering it was an image of "Serenity" from Firefly. If we could trace the design onto the fabric first it would certainly reduce the chances of messing things up. We had to think outside the box and use some of our dressmaking kit in new and interesting ways. 

 Option 1

Drawing out a design in free hand first with Taylors Chalk before filling it in with Fabric Paint or Fabric Pen.
If you find the triangular dressmaking chalk tricky to use then  there are Dressmaking Chalk Pencils out there as well as a special Vanishing Fabric Marker.

Handy if the design is relatively simple, but what if you have a more complicated design?

Option 2

Trace the design onto the fabric using Dressmakers Carbon Paper. This handy bit of dressmaking kit is normally used to transfer markings such as dart lines onto your fabric.  Dressmakers Carbon Paper actually comes in a lot of colours, and not in 'carbon'. Most packs have blue, red and yellow as well as white so finding a sheet to show up on your fabric should be easy. Place the 'carbon' paper onto the fabric (coloured side down) and then pop your design over the paper. Use a tracing wheel to transfer the design onto your fabric, and then use paint and pens to  fill it in.

Time was  running short  and whilst option 2 would work very well we couldn't get a print out of the design the right size. So a change of plan was in order. Pac-Man! Well more accurately one of the ghosts (who by the way are called "Blinky" "Pinky" "Inky" and "Clyde").  A "Blinky" was drawn out on graph paper to ensure it was nice and 'blocky'. The graph paper pattern was then used to cut the ghost out in some non fray velour. Eyes and pupils were cut out of felt. The pupils where added to the eyes with Wundaweb instant hemming tape, then the eyes were stuck to the body with wundaweb and then the whole ghost to the t-shirt with Wundaweb. Wundaweb Instant  Hemming tape is easy to use. You just place it between the two layers of fabric and then iron your garment. A pressing cloth isn't essential but gives a much better finish. One unique geeky t-shirt made in under 15 minutes. Instant hemming tape is normally good for 15 washes so it should last a while.

So next time you have to make something special in a flash DON'T PANIC! Just look around your sewing box and think how you can use things a little differently. 

Monday, 22 October 2012

A simple Halloween & Autumn Decoration

In the past I've made some intricate stuffed fabric Pumpkins. Whilst many people liked these a lot of people said they were put off by the amount of time each pumpkin would take, and the amount of sewing. After some playing around I've managed to create a very simple, but in my opinion rather cool pumpkin pattern. Don't feel constrained to orange fabrics, you can make a very ethereal creation with  a shimmering white or pale pink, or something festive with a Brocade.

You will need:
A rectangle of fabric 15 cm by 30cm
Small piece of fabric for the stalk
Scissors
Pins
Sewing Needle  (hand sewing needles  and Sewing  Machine Needles if using a machine)
Tailors Chalk
Toy Stuffing
Thread

Mark out a rectangle of 15cm by  30cm and cut out.

  Fold the fabric in half giving you a Square of 15cm by 15cm Stitch down the side opposite the fold

Sew two lines of parallel stitches at the bottom of the square. This is to perform a gather. You can do this perfectly well with hand sewing, just pull the threads tight and tease the fabrics into gathers. I used a sewing machine, anchoring the threads at one end with a back stitch but not at the other, then pulling the threads to make the gathers.


 Once you've gathered the fabric like this top stitch between the two lines of stitching to secure the gathers. Fold  right side out. You should now have a little bag with an open top and gathered bottom.


 Fill the pumpkin with toy stuffing. You can use cut up scraps of wool or fabric to save money here, But a bag of toy stuffing costs under £4.00 and my bag has lasted me many many projects.

With a hand  sewing needle run a stitch along the top of the pumpkin, pull this tight and secure to create a ball. 

To shape the groves into the pumpkin secure some strong thread with a stitch at the top and wrap it to the bottom of the pumpkin pulling tight, secure with a stitch and wrap the thread to the to and secure with a stitch  repeat   for as many grooves as you like. I started with four, equally spaced.


Take two rectangles of green fabric to be the stem. I used 6cm by 4.5cm. Sew together along the long sides and one short side (leaving an opening for turning through and stuffing. The line of stitching at the top doesn't have to be straight, making it a little slanty can make the stem look more organic.


Turn through using a pencil (yes I DID spend 10 minutes trying to use my finger before I thought of the pencil) and then use the pencil to stuff the stem with toy stuffing.


Stitch the stem onto the top of the pumpkin using small stitches going around the base of the stem.


And behold a pumpkin. I thought this was cute, however my favorite pumpkins have more grooves so I added another set of four using the same method as the original grooves.
 I am rather proud of my little pumpkin. There may seem to be a lot of steps but only because I wrote down EVERY little thing. You should be able to make up one of these little guys in 20 mintues or so. You could even cut out triangles  in felt to make a Jack-o-lantern and glue it on with fabric glue. As well as Halloween these decorations could be used for an Autumn display  or part of a costume (be it the green goblin or headless horseman)

Friday, 28 September 2012

Hosting a Halloween party.

Rainbow Halloween Star
All kids love Halloween, all kids from age 0 to 110. Making costumes is fun, but you need to show them off. Some parents are concerned with  letting their kids go door to door though. It is a shame to miss out on dressing up and having fun, so there is a simple answer. A Halloween party! Hosting a party can be as simple or as complicated as you like, but here are some tips taken from my experiences working as a party magician.

1) Find a venue for hosting your party.
If you have a large space at home or not many people coming for the party then you should have no problem hosting at home. However hiring a venue may be a lot cheaper than you realize . Club together with other parents to hire a village hall or even the school hall. (one school hall I know costs £20 for 2 hours, between 10 parents that isn't much at all). Many village councils are even offering a reduced rate for Halloween parties to help keep kids safe and off the streets.

2)Decorating your party space.
There are packs available for decorating your party place but these can become expensive. Now would be a great time to start Halloween Bunting making. Black and Orange Poly Cotton makes great bunting. For a added touch  cut out the pendants with pinking shears to give your bunting a zig zag edge. This will also help the bunting last longer. Covering furniture with white cloth can help stop it getting mucky, but also give the room an eerie Haunted house feel, like a house where everyone moved away long ago. Check on line for creepy stencils to download to make cardboard cut outs as well.

3)Music and Games
All the big shops do  mix cd's of Halloween party music and princes start for £5 or so. As for games, if possible keep it non-elimination. Many people have started to complain about the lack of elimination games in schools as they can prepare kids for the little knocks in life. This may be true BUT if you have elimination games in your party you will have a bunch of kids sitting around twiddling their thumbs waiting for the game to end. This will not be fun for anyone. Here are some games to try.

Esrella Amis Stars
Pass the Parcel  Take a price, be it a toy Dinosaur or a sweet treat and wrap in one sheet of paper, then take another treat and place that on your parcel then wrap with paper again. Repeat until you have a layer for everyone. Play music and stop it at random points, a child unwraps and ill have one small treat, continue the music and stop again, if your quick you can make sure everyone gets a prize BUT no-one knows who will get the big one at the center.

A Monster's tail. You need a long scarf or decorate a strip of fabric about 3 metres  long to look like a dragon's tail (think glitter for scales, or bright colour stripes. get the kids in a line and pop the hands of the kids on the shoulders of the kid in front of them. Wrap the fabric around the waist of the last  kid leaving a tail of suitable length. Now the head of the dragon has to catch the tail . A great game with lots of space. when the head catch the tail they become the new tale, leaving a new kid upfront to be the head. if you have enough kids split them into teams with a prize for the first team team where every kid gets to be the head and tail.

Skull and Crossbones fabric
The Balloon pass Challenge. Get the kids into two teams, and  get them to stand in a row. Get a balloon for each team and make them pass the balloon from the  front of the row to the back. When the balloon gets to the back the kid at the back runs to the front and then repeats the process. The first team where every kid has been to the front wins.Make the game harder by mixing up whether the balloons  have to be passed over their heads or between their legs.

Apple Bobbing. The classic apple bob. Some schools have banned this fearing germs. According to the Health And Safety executive though there is nothing to fear. If you are screamish about the idea there is an alternative . Cut out apple shapes on pieces of paper, on one side write a challenge like "3 press ups" or "recite Mary had a little lamb backwards". Then pop a paperclip on each one and  place them writing side down in a bowl. Attach a magnet to a piece of string and tie the string to a pencil to make a rod. Now the kids can go fishing for challenges.


Other things to Think about. 
Red Spider Web 
If some kids are going to be at your party without their parents then make sure you have contact details for them. If you are partying in your own home  spend 10 minutes taking the breakable items out of the room first. You will be a lot more relaxed if  you're not panicking about your favourite vase. Chocolate is lovely but can be messy. If you avoid chocolaty treats you will be spending less time the next day trying to clean the carpet and sofa.

Being at parties is always fun, but hosting them can be amazing fun. So get together with friends and family now and start planning a little adventure for yourselves and those around you.