Monday, 10 October 2011

Chocolate for Breakfast!

One of the greatest perks of being an allotment gardener is that you really experience each season fully. You look forward to each part of the year knowing the rewards they bring to you. Working in a fabric shop is much the same. We get to experience each season a little longer than normal. We thrive on setting out Summer wedding fabrics and light cotton for dresses, heavy corduroy for trousers in Autumn as well as knitting wool, thick fleeces for winter and the bright pastels of spring. For many of us setting out the rolls of organza into nice seasonal colour schemes has become a form of relaxation therapy.

The timing of our seasonal changes however may seem a little odd. Many people like to think a season a head as they need time to design and make their creations. We intern need to be a little ahead of these people to supply their needs. And that is why even though we are still three weeks away from Halloween visitors to our Colchester branch will already see evidence of Christmas preparations.  We promise we wont make you sick of Christmas by playing Band Aid's "Do they know it's Christmas" on a loop and have our own festive decorations out before December. We're just giving you the chance to pop in and prepare for the season in your own time. We have a range of craft fabrics with Christmas patterns on display now as well as Christmas Stocking Kits and Advent Calendar Kits. A hand crafted quilted advent calendar is a great alternative to a disposable chocolate filled calendar. It comes with little pockets, one for each day of Advent which you can fill with a healthier treat of  your choice (or sweeties).

It is strange though that for 24 days of the year we tell our kids it's OK to have chocolate for breakfast.


One of my big guilty Christmas pleasures  is  visiting Harrods Christmas display. As you may expect from a shop renowned for excesses the  Christmas decorations are amazing. Many years ago I fell in love with their  traditional looking Christmas stockings and was pleasantly surprised at how affordable and easy they are to make.


We now have many different styles in the shop and they are all simple to make up. Over the years I've found them a great gift for people who are difficult to buy/make for. A home made stocking filled with nuts, dried fruit, mulled wine kits or something small and personal like packs of seeds or a small book really does give people the feeling that at you've gone the extra mile.

So please pop in and see what we can do to inspire you this festive season or visit us on-line at

Monday, 26 September 2011

Avhast! A simple Pirate Shirt

Much like our Pirate Pants tutorial this is not meant to replace the many fine pirate/poet shirt patterns available. This is a quick shirt top easily made out of poly cotton for someone with an emergency party crises.
For an Adult you will need:
Light weight fabric (poly cotton or cotton) 2.5m-3m
Chalk
Ruller & Tape measure
1/4 elastic- 1m
Thread
pins

Time-depending on how tidy you're planning on sewing 30 minutes to an hour
You will need your chest meauserment and the length of the shirt you require as well as your arm length.

Cut out two rectangles of fabric. The length should be the desired shirt length plus 10 cm and the width should be half your chest measurement plus 9 cm. If you're using 150cm wide fabric, or if you are petite then you should be able to fold the fabric in half, selvage to selvage and cut out both sections at once. 

Fold each section in half along the length and mark a mark in the middle of the top of each section. On both sections mark out 8 cm on either side of the dot. This is the start of your neckline.  on the section that will be your back draw a line 3 cm down from the dot and draw a curve for the back of your neck. On the front section draw a line 7.5 cm down from the centre and draw in the front neckline. Now make a slit for the from opening of your shirt about 10 cm down from the neck line. Hem the slit.


Right sides together sew the front and the back together at the shoulders. From the shoulder seam mark down 30 cm along the length of the front and back of the shirt and on both sides to make where the sleeves will go.  THe sleaves should be your arm length plus 5 cm and about 60 cm wide.

Right sides together pleat the sleeves  onto the body of the shirt and sew.


Right sides together line up the front and back panels pin and sew You're almost done. try on the shirt and check your sleeves. They will probably be very long  as the shoulders of a pirate shirt are far larger than a regular shirt, giving it the baggy effect. You can trim the sleeves to length (leaving enough fabric to make an elastic casing) or cut the sleeves a little longer so when they are pulled  up  your arms a pleasing baggy effect is created.


All that is left is a collar. Maure your neckline and take a rectanle of fabric  15 cm wide and 3 cm longer than your neckline. Press in the seam allowance on the short edges of the collar.

Fold the fabric in half along it's length and press.

Now unfold and fold both sides of the fabric so the edges of the sides are folded into the crease just pressed in.


Fold the fabric along the length again. Top stitch ont he neckline.


  Thread cord through if desired.


Wear with the pirate pants and any other acessories you may have at home for a cheap and quick Pirate outfit.

Monday, 5 September 2011

Dot Com-unity Service

Possibly one of my stranger titles I know but it makes sense honest so  stick with me here. Everyone at Fabric8 loves working in the shop. It's not just the fun we have with fabric and the cool projects we  get to do but also it's the people we meet. We meet fantastic  customers some of which I've blogged about here, re-enacters, ewoks, cos-players and people who just love fine tailoring. We consider it a genuine honour to help these people out, to be part of their community. That's why we donated some vouchers for the Star Warriors raffle and why we gave fabric to the Colchester free Festival and leant them our magician for a day.  We may get a mention here or there that raises our profile a little this is true, but the main reason why we like to help people is we want to be part of the effort to  forge a strong sense of community around us. Some members of staff have been known to research historical costume design for customers with an interesting project  or to help a novice sewer finish off their first project not only because these are fun things to do but also to strive for an ideal beyond the noble pursuit of supplying fabric and haberdashery.

  Whilst helping out in the physical world it's important to remember that our little shop now serves a wider community. Many of those reading this blog may not have visited Colchester of Felixstowe and so not been into the welcoming worlds of our sister shops. Just because we don't ever get to meet these people it doesn't mean we don't want them to be part of the strong community we're involved with. That's why some staff members have sat down and worked out some free, easy to follow patterns. There are a few on this blog including making pirate pants and pouches. Pirate or poet shirts will follow this week. So please feel free to be part of our community. Ask us anything you like from whether we can stock a certain fabric to the definitive history of pockets (already researched by Arnold Judis Rimmer for all the Red Dwarf fans out there) and we will try to accommodate your needs. You can comment on this blog or join our Facebook Group Or follow us on Twitter @Fabric8Online.

One final note. Try to relax and enjoy December this year by starting your Christmas sewing now. I know i've found my Waistcoat fabric for this Christmas.

Friday, 26 August 2011

Pirate and Harem Pants!

IN the shop we often have harassed looking parents needing a costume quickly. We have wide range off very lovely and easy to follow patterns. However sometimes they need a costume in about 10 minutes so I tell them about my method for making harem pants for belly dancers. These are very lose and baggy trousers which when made in something light and floaty have a genie type quality. Here I've made them in black and red for a more piraty look.  The dimensions here are for a teenager, the method remains the same for a younger person you just need to alter a few measurements for a smaller child.
You will need;
About 2 meters of fabric (something light and not stiff,  a light cotton or a satin lining works very well)
1 Meter of elastic 20-25 mm wide
1 meter of elastic 10 mm wide
thread
Scissors (We recommend high quality dressmaking scissors which never gets used for anything other than fabric)
Thread cutters (thread cutters or embroidery scissors avoid you wearing a dull spot in the middle of your dressmaking shears. They only cost between £1.50 and £5.00 and will more than double the life span of your Dressmaking Scissors
Pins  (and I highly recommend a magnetic pin cushions, carefully putting pins back into a cushion may not seem like much time, but it adds up to quite a bit during the construction of a garment)
Chalk

Also recommend : Pirates of the Caribbean DVD's to watch whilst sewing

Step1 Draw little arrows along the selvedge on one side and then cut the fabric in two across the width (leaving you with two lengths a metre long. Fold each in half selvedge to selvedge and lace one on top of the other making sure the arrows on both are pointing in the same direction (this stops the trousers having one leg in one direction and the other leg in the other, not so important with fabrics with a nap maybe, but under strong lighting even fabric with no nap can still look different if one piece is upside down)

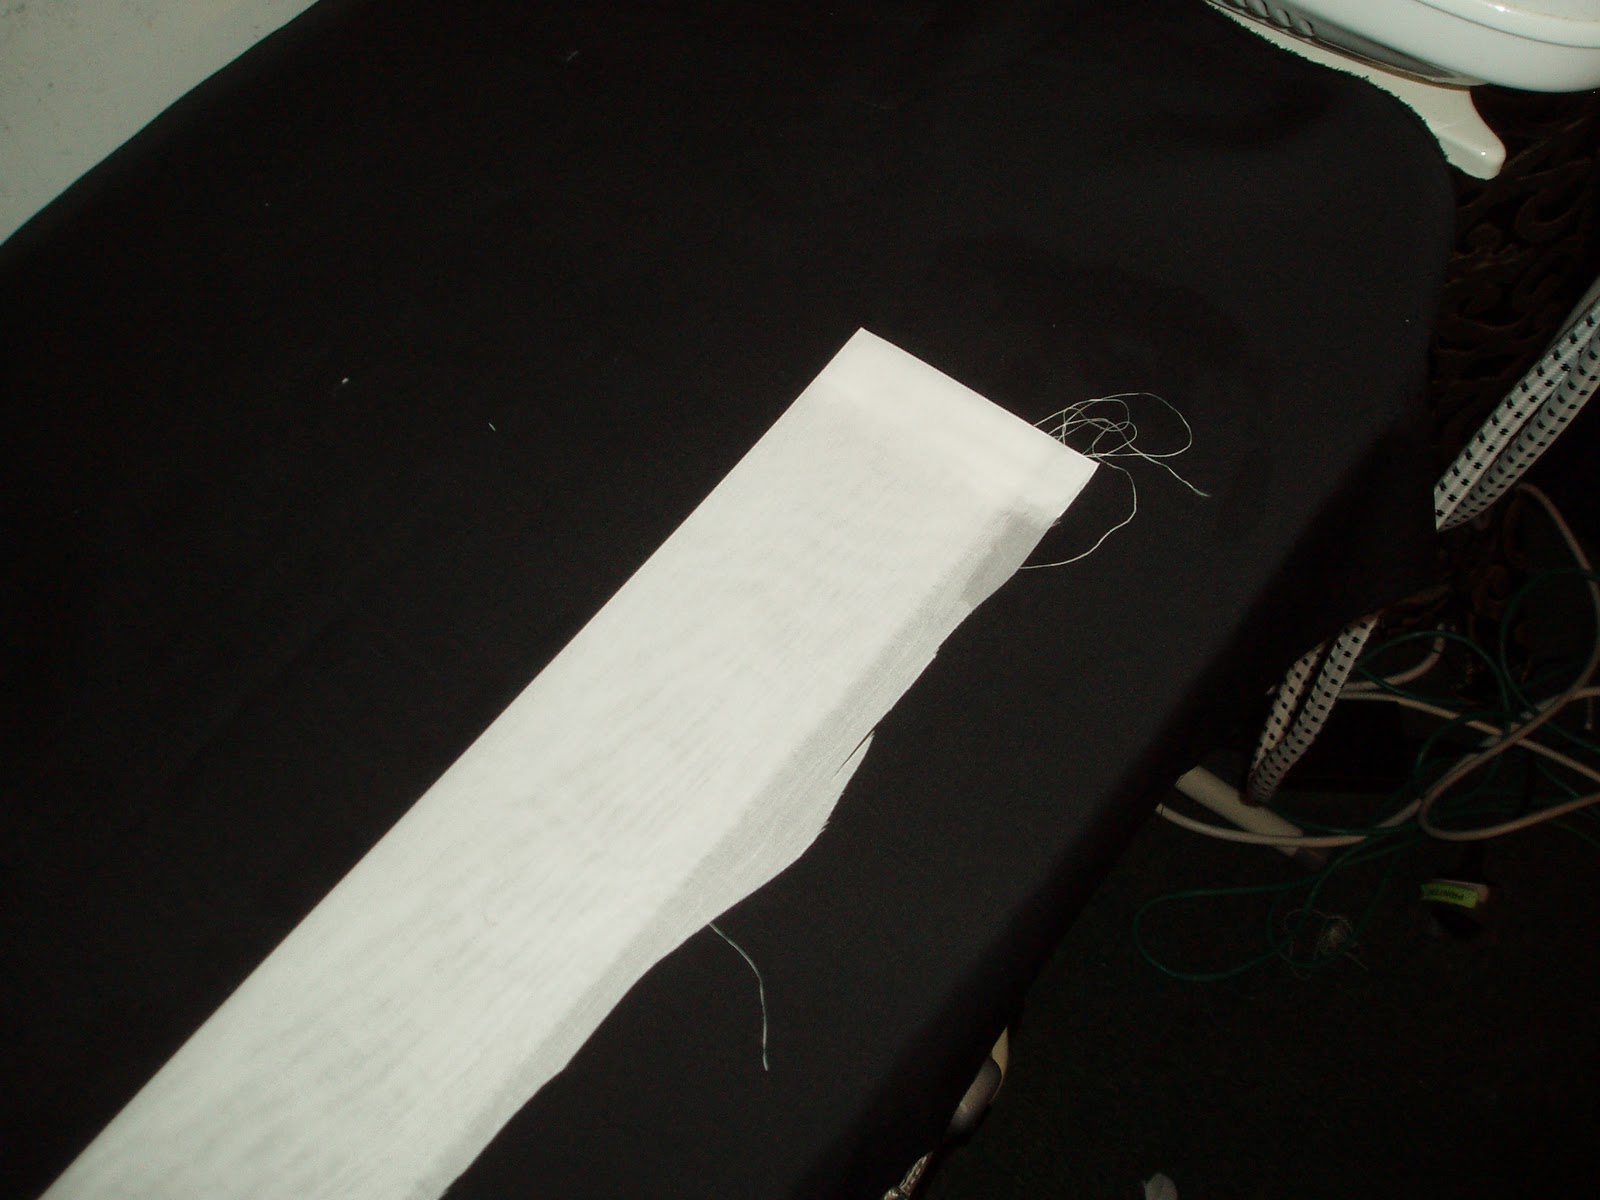
Step 2. ON the selvedge side mark off a line 30 cm down and 20 cm across draw a curve at the corner.

Cut along the curved line

Now when you open out the fabric you should have two sections that look like this
The selvedge sides become the inner leg seams. One one section fold the fabric right sides together selvedge to selvedge. Pin along the selvedges (inner leg seams) and sew (seam allowance 5/8 inch or 15mm) Repeat for the other section.

 You now have two trouser legs, each with half of the waistband on top.THese are both insdie out. Turn one outside out and then slide it into the other trosuer leg, lining up the seams you've just sewn and the waistband.
Pin and sew long the crotchline.  Clip the seam at the curve and you're almost done.


At the waistband and at the end of the trouser legs you simply have to make a casing for the elastic. Fold the hem up on the inside of the fabric and then fold again (around 12 mm) sew  in place leaving a gap for the elastic, thread the elastic through using a safety pin. Repeat for the waistline, folding the fabric the width of the elastic you're using there.

And there you have it, a very quick method for making baggy pantaloons. I've been known to whack a pair together in 20 minutes, but take your time for your first few goes, never rush and always strive to enjoy yourself.

To make these  for young buccaneers and genies  follow these simple steps.
To find out how much fabric you need measure from their waist to the floor. Add about 20 CM and double the total.
For step 2 instead of marking down 30 cm, mark down the distance between the wasit and the chair seat when seated and add 5 cm. Instead of drawing the line 20 cm from the edge reduce this to about 12cm for under 12 year olds.

Happy pirating :)


Monday, 8 August 2011

A simple Pouch Tutorial.

Sewing has many benefits. To many it's a relaxing hobby and a way of creating beautiful things to wear or fantastic furnishings. But to me there is an extra use to being able to sew and that's the ability to make or remake useful little things to help in day to day life. Custom made backs, extra pockets in waistcoats a pillow with a hidden compartment for a frozen gel pack for hot summer nights are just a few examples where my sewing machine has provided me with the means to make my life just a little bit better each day. The most recent example was a pouch. Anyone who has come into the shop on a weekend may have seen me indulge in one of my other passions, magic. I perform quick card tricks to entertain board children of distraught  parents (although how they could be board in a wonderful little fabric shop I have no idea).  I recently picked up the classic trick "The Cup and Balls" for a friend and whist the cups themselves  are beautiful the pouch they came in left a lot to be desired.  They looked like part of a sports kit, hardly suiting for our arcane needs.  And thus the need for a new pouch was born.


Step 1 - Draught a simple pattern. This pouch is going to be made of two panels on the outside and two panels of lining. Therefore  the width of the pattern needs to be half of the circumference of what you'd like to put in the pouch plus twice the seam allowance (once for each side of the pattern) and with about 5 cm extra space for putting your hand in to grab the contents of the pouch.


Step 2 - Fold a piece of fabric for the outer shell  of the pouch in half and do the same for the lining, and then place the pattern on top. Pin Pattern to the fabric and then cut out. Leaving you with 4 panels of fabric, 2 outer pieces and  2 inner.


Step 3- Take one outer panel piece and one panel of the lining and place one on top of the other, right sides together. Pin and then sew along the top. Repeat this for the second outer panel and lining panel


Step 4 - Place the panels on top of each other again, outer panel on top of outer panel, Lining on top of lining right sides togehter. Pin and sew right around the edge leaving a 5 cm gap in one side of the lining.


Step 5 - Turn pouch right side out through the gab in the lining . You should now have a  good idea of if your pouch fits and what it will look like.  Stitch the gap in the lining shut with a ladder or slip stitch (or a regular stitch if no-ones going to see inside it)


Step 6 - Run two parallel stitches near the top of the pouch and gently unpick the side seams  in between the two rows of stitches.  Thread cord in between the two rows of stitches, pull tight. You now have your  pouch.
There are many very beautiful  pouch patterns available.  In particular Vogue do some fantastic patterns which I use for giving Christmas gifts an extra personal touch. However I find this method a great trick for quickly making something special. For  both the commercial patterns  and this simple pouch pattern I highly recommend saving any scraps of nice fabric left over from other projects for use in little projects like this.

If you ever find yourself  wondering about your place in the universe I think the words of the great Technomage- Elric  apply to those of us who sew and craft. "We are dreamers, shapers, singers, makers"


Friday, 29 July 2011

Fabric, and creating or recreating your own reality.

A wise man once wrote "Things that try to look like things often look more like things than things do." This quote is from the wonderful Diskworld novel "Wyrd Sisters" by Terry Pratchet. He was writing about how a real life crown seemed dull and plain next to the bejeweled  piece of painted tin of a crown from the prop store of theatre company.  For many years growing up I believed that to re-enact something from history or a TV show you simply made something that looked vaguely like the historical object or prop piece you wished to portray. Working at Fabric8 has shown me that quite the reverse is true. We are fortunate to count historical reenactors and Cosplayers and LARPers amongst our customers and helping these groups of people is great fun.

   Historical reenactors are history enthusiasts who dress up in fully authentic clothing and portray life set in a certain year at public events. Being close to Kentwell Hall means the bulk of our reenacters portray life set in Tudor times for Kentwell's big annual re-enactment.  This is one of the main reasons we keep so much wool and linen in stock.

  Cosplayers are a different breed. They re-enact characters from fiction. The two main groups are those who re-enact Japanese comics and cartoons (manga and anime) and those who re-enact popular films and TV shows (mainly sci fi). Colchester has a strong anime cosplay group, you may have seen them having a picnic in the park.  This young cosplayer is Ms Chelsea Dagger and is always a delight to serve. When I  hear people decry the 'youth of today' We always point out that by the nature of our work the young people we always meet are exciting active and creative :) The most fun part of helping anime cosplayers is that because they are re-enacting a drawing and not  costume that's already been made we can have great fun trying to work out what fabrics need to be used for the desired effect.


This young and up and coming ewok Is one of the Star Warriors  A local band of sci fi enthusiasts who attend events in sci fi inspired costumes  and raise money for charity. Do you have any idea how much fun it is to drop into conversation that you served an Ewok  at work?  Again these costumes are meticulously researched. There is a host of material on the web and in books all about the  costuming in films (and of course on DVD extras) If you love fashion go through your dvd collection and see if there is a costuming extra, they are always fascinating and you often learn some very useful information.

LARPing or Live Action Role Play is the re-enactment of things that never were. Originally a LARP event just involved popping on some leather and whacking your friends with a rubber sword, but it's moved on since then. Many LARP events don't even have combat but instead take the form of detective games (murder Mystery  nights) or role playing as tea obsessed inventors.

The reason why I'm writing about these groups is not just because they buy fabric from us. It's because each group requires meticulous research and attention to detail. The Historical reenacters need to know if a fabric was available in their  chosen time, and if the colours they want were suitable for someone in their trade or class. The sci fi reenactors need to know how a costume was originally made, how does one get just right colour fur to become Wicket The Ewok (car spray paint apparently. The anime cosplayer needs to work out how a costume could have the same look and feel as a cartoon characters when it's possible the fabrics they would use do not exist. And the LARPers need to ensure their  fabric chooses will wear well in the field and not cause them to over heat or become disheveled during their days events.   Almost without fail our customers have done their own research and done it well but we're always happy to help out as well and pick the brains of any reenactors or nerds on staff.  And next time you see a reenactment just think about how much hard work and dedication went into making those wonderful costumes even before the first stitch was sewn.


  All cosplayers  and reenactors  need somewhere to show off their skills though, so if you have a penchant for dressing as an Ewok, or a space themed anime why not surprise people and the Colchester Free Festivals Kidstival   with their Space themed event at Castle Park on the 27th of Augest 2011?
   

Monday, 18 July 2011

Tying the Knot in Dots!

More and more people have been coming into the shop to by bridal fabric.  Some are making all the outfits themselves whilst others are leaving the wedding dress to a professional and then making the bridesmaid dresses as a family. These are both ways of saving a lot of money whilst adding a more personal touch to a wedding.  However last week I learned  of something very interesting. A local couple are having a 1950's style wedding. Young ladies were browsing our pattern books pointing out  different styles to each other before running through our polka-dot section.

  Every bridal party in our shop has been excited, how could they not be?  However this group were very energized with the idea of making retro outfits for the event and then it hit me. A retro wedding will certainly stick in peoples memories. Also even if your guests do not want to create their own clothes, retro gear can be found relatively inexpensively (certainly cheaper than some of the dresses I've seen people  buy to attend weddings in). If your friends do choose to make their own outfits  then they are in for a world of fun. Retro fashion dresses tend to be simpler to make so even a novice dressmaker can proudly show off their creations, and the fabrics tend to be relatively  inexpensive.Also a themed wedding helps guests feel more confident about choosing what to wear.

  So if you're planning a wedding think about giving it a theme. It doesn't have to be retro, just make it fun.